If your Instagram Stories show up with awkward crops, black bars, or text hidden behind buttons, the cause is almost always one thing: the aspect ratio. Stories live in a specific shape, and when your photo or video does not match that shape, Instagram makes the decision for you—usually badly.
This guide explains exactly what the Instagram Story aspect ratio is, why 9:16 and 1080 × 1920 are the numbers that matter, where the “safe zones” sit, and how to resize any image—portrait phone snap, square photo, or wide landscape shot—so it fills the screen cleanly every time.
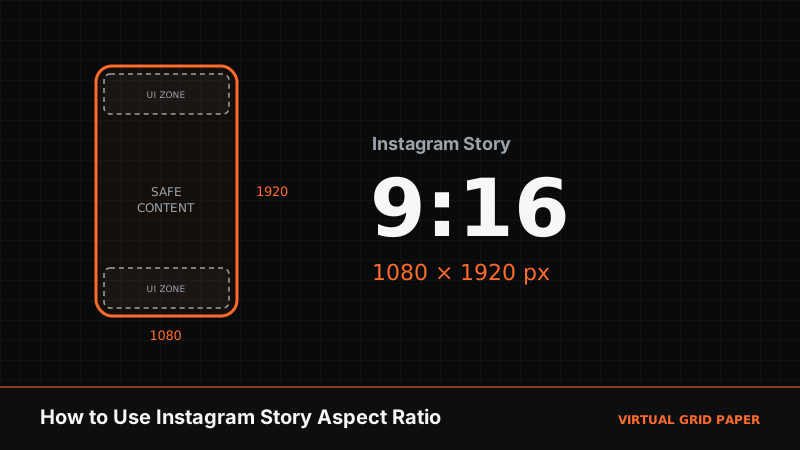
Key Takeaway Instagram Stories are 9:16, best uploaded at 1080 × 1920 pixels. Match that shape before you post and Instagram stops cropping your work for you. Keep important content out of the top and bottom ~250-pixel UI bands so nothing gets covered.
What “Aspect Ratio” Actually Means
Aspect ratio is simply the relationship between an image’s width and its height, written as two numbers separated by a colon. A 1:1 image is a perfect square. A 16:9 image is a wide rectangle—the shape of a TV or a YouTube video. The ratio describes the shape, not the size: a 9:16 image can be tiny or huge, but as long as the height is always 16 units for every 9 units of width, the shape stays identical.
Instagram Stories use 9:16. Rotate a widescreen video ninety degrees and you get the same proportion—tall and narrow, built for a phone held upright. Because almost everyone views Stories on a vertical phone screen, 9:16 is the shape that fills the display from edge to edge with nothing wasted.
The ratio and the pixel size are two sides of the same coin. 1080 × 1920 is a 9:16 image because 1080 ÷ 9 = 120 and 1920 ÷ 16 = 120—both dimensions share the same multiplier, so the proportion holds. If you ever want to confirm a size is truly 9:16, the aspect ratio calculator reduces any width-and-height pair down to its simplest ratio for you.
The Numbers That Matter
For Stories you really only need to remember two things: the ratio 9:16 and the size 1080 × 1920 pixels. But Instagram has several formats, and mixing them up is a common cause of bad crops. Here is the full picture:
| Placement | Aspect ratio | Upload size (px) |
|---|---|---|
| Story / Reel | 9:16 | 1080 × 1920 |
| Square feed post | 1:1 | 1080 × 1080 |
| Portrait feed post | 4:5 | 1080 × 1350 |
| Landscape feed post | 1.91:1 | 1080 × 566 |
| Profile grid thumbnail | 1:1 (cropped) | displays as square |
A few practical notes on these numbers:
- 1080 pixels wide is the target, not the maximum. Instagram caps the displayed width around 1080px, so uploading wider rarely improves quality and just inflates file size. If you want extra sharpness for text-heavy designs, 1440 × 2560 (still 9:16) is a safe step up.
- Never upload below 1080 wide. A 720 × 1280 image is still 9:16, but Instagram upscales it to fill the screen, which looks soft.
- Keep the ratio exact. 1080 × 1900 is close to 9:16 but not exact, and Instagram will still nudge it. Lock the height to 1920 when the width is 1080.
If you need a one-click way to turn any photo into a correct 9:16 frame, the Instagram Story ratio tool tests your image against 9:16 and exports it at a clean 1080 × 1920. For feed posts in other shapes, the Instagram post ratio tool covers 4:5, 1:1, and 1.91:1.
Why the Right Aspect Ratio Matters
It is tempting to shrug and let Instagram “figure it out,” but the ratio decides three things you actually care about:
- What stays in frame. When your image is the wrong shape, Instagram crops it to fill the 9:16 screen. A horizontal group photo can lose the people on both ends. A tall product shot can get its logo sliced off. Resizing yourself means you choose the crop.
- Whether you get bars. The alternative to cropping is “fit”—Instagram shrinks the whole image until it fits and pads the gap with solid color or a blurred copy. Those bands eat screen space and look unfinished.
- Perceived quality. A full-bleed, pin-sharp 9:16 image reads as intentional and professional. Bars, soft upscaling, and chopped subjects read as rushed. Same photo, very different impression.
Because Stories vanish in 24 hours, people post them fast and often—which is exactly why a repeatable sizing habit pays off. Get the ratio right once and every Story after that looks consistent.
How to Check an Image’s Aspect Ratio
Before you fix anything, confirm what you are starting with.
- On a phone: open the photo’s details (the “i” or info button). It lists dimensions like
3024 × 4032. Divide the smaller number into the larger—4032 ÷ 3024 ≈ 1.33, which is 4:3, the standard phone-camera shape. - On a desktop: right-click the file and open Properties (Windows) or Get Info (Mac) to see pixel dimensions.
- The quick math: 9:16 as a decimal is 0.5625 (9 ÷ 16). If width ÷ height equals 0.5625, you already have a Story-ready shape. Anything larger than that is too wide and will need cropping or a background.
Most phone photos are 4:3 (0.75) or, from newer cameras, 3:4 portrait. Neither is 9:16, so they will need adjusting—which brings us to the two ways to do it.
Fit vs. Crop: The Two Ways to Reach 9:16
Every method of making an image 9:16 is really one of these two approaches. Understanding the trade-off is the whole game.
Crop to fill. The image is scaled up until it covers the entire 9:16 frame, and whatever hangs over the edges is trimmed away. The result fills the screen with no bars, but you lose part of the picture. This is best for photos with room to spare around the subject—landscapes, portraits with headroom, anything where the edges are not essential.
Fit (letterbox). The whole image is kept and scaled down until it sits inside the frame, leaving empty space above and below that you fill with a color or a blurred version of the photo. Nothing is lost, but the subject appears smaller. This is best when every edge matters—a full infographic, a screenshot, a wide group shot where no one can be cut.
Rule of thumb If the subject is centered with breathing room, crop. If the edges carry information you cannot lose, fit and style the background. The Instagram Story ratio tool offers both modes with interactive pan and zoom, so you can preview the exact crop before exporting.
Step by Step: Resize Any Photo to 9:16
Here is a reliable workflow using the Story ratio tool, though the same principles apply in any editor:
- Upload your photo. The tool reads its real dimensions and tells you how far it is from 9:16.
- Pick Fit or Crop based on the rule above.
- Pan and zoom to position the subject. In crop mode, drag the image so the important part sits in the central safe area (more on that next). In fit mode, choose a background color or a blurred fill.
- Confirm the output is 1080 × 1920. This is the native Story size—no upscaling, no bars.
- Export as PNG or JPEG and upload to your Story. PNG keeps text and graphics crisp; JPEG makes smaller files for photos.
Because the whole process runs in your browser, nothing is uploaded to a server—your photos stay on your device.
Safe Zones: Keep Content Where It Can Be Seen
Getting the ratio right is half the job. The other half is knowing that Instagram’s own interface sits on top of your 9:16 canvas. If you place a headline too high or a call-to-action too low, the app’s buttons cover it.
On a 1080 × 1920 Story, the rough reserved areas are:
| Zone | Approx. height | What covers it |
|---|---|---|
| Top band | ~250 px | Profile photo, username, timestamp, close button |
| Bottom band | ~250–310 px | Caption, “Send message” reply bar, link stickers |
| Center | ~1360 px | Your safe content area |
Treat the middle ~70% of the frame as your working space. Keep headlines, faces, logos, prices, and swipe-up prompts inside it. You can still let a photo or gradient run full-bleed to the edges—just do not put anything essential in the top or bottom bands.
Common Mistake Designing a Story on a plain 9:16 canvas with text pushed right to the top edge, then discovering in the live Story that your username sits directly over the headline. Always leave the top and bottom quarters clear of critical text.
These margins shift slightly between phones and between the main Story view and the reply screen, so build in a little extra buffer rather than hugging the limits.
Handling Different Source Shapes
The right move depends on what you are starting with:
- Portrait phone photo (3:4 or 4:5). You are close. A gentle crop to 9:16 usually works with minimal loss—trim a little from the top and bottom.
- Square photo (1:1). A square cannot fill 9:16 by cropping without losing a lot. Either crop in tight on the subject, or (better) place the square in the center and fill the top and bottom with a matching color or blurred background.
- Landscape photo (16:9 or 3:2). This is the hardest case—it is the opposite shape. Cropping to 9:16 keeps only a narrow vertical slice. Usually it is better to fit the landscape image into the upper portion and use the space below for a caption, logo, or blurred fill.
- Screenshots. Phone screenshots are often already close to 9:16 but include status bars. Crop those away and check the result still measures 1080 wide.
- Video. The same 9:16 rule applies to Reels and Story video (1080 × 1920). Shoot vertically whenever possible; rotating a horizontal clip to vertical loses most of the frame.
Designing Stories From Scratch at the Right Ratio
If you are not resizing an existing photo but building a Story—a sale announcement, a quote, a birthday post—start on a canvas that is already 9:16 so you never fight the ratio later. A few tools make this straightforward:
- The Instagram Story maker gives you a 1080 × 1920 canvas with text, shapes, photo layers, and templates—everything already sized to the Story frame.
- The Instagram Story frame maker drops your photo into a styled 9:16 frame (borders, polaroid, filmstrip) so a single image fills the screen with a designed edge.
- The Instagram Story font generator builds crisp 9:16 text graphics when you want typography to be the hero.
- The Instagram Story grid maker arranges several photos into one 9:16 collage—ideal for recaps and before-and-afters.
- For celebrations, the Instagram birthday Story maker ships 12 ready-made 1080 × 1920 themes.
Because every one of these starts at the correct ratio, your design is Story-ready the moment you export—no cropping surprises.
Common Aspect-Ratio Mistakes to Avoid
- Uploading a square or landscape photo and accepting the bars. Resize to 9:16 first, or style the empty space on purpose.
- Exporting below 1080 pixels wide. It looks soft once Instagram upscales it. 1080 is the floor.
- Trusting “close enough” dimensions. 1080 × 1900 is not 9:16; Instagram will still adjust it. Lock to 1080 × 1920.
- Ignoring safe zones. Text in the top or bottom quarter gets hidden by the interface.
- Re-saving JPEGs repeatedly. Each export adds compression. Keep a master file and export once at the end.
- Mixing up Story and feed ratios. 9:16 is for Stories and Reels; feed posts want 4:5, 1:1, or 1.91:1.
A Quick 9:16 Checklist
Before every Story, run through this:
- Is the image 9:16? (width ÷ height = 0.5625)
- Is it at least 1080 pixels wide?
- Is the subject inside the central safe area?
- Did I choose crop or fit deliberately, not by accident?
- Is it exported as a fresh PNG or JPEG, not a re-compressed copy?
Five quick checks, and your Story fills the screen the way you intended.
Related Guides
Conclusion
The Instagram Story aspect ratio is not complicated once you know the two numbers that run the whole show: 9:16 for the shape and 1080 × 1920 for the size. Match those before you upload, keep your important content clear of the top and bottom UI bands, and decide for yourself whether to crop or fit—rather than letting Instagram guess.
Do that consistently and your Stories stop looking accidental. Whether you are resizing a single photo with the Instagram Story ratio tool or designing from scratch in the Instagram Story maker, starting from the right ratio is the difference between a Story that fills the screen and one that fights it.